
Doors, windows and railingsWorkshop notes
Spray painting metal railings in a RAL colour
A practical guide to repainting steel railings in a RAL colour: weather, rust removal, degreasing, masking, primer, spray or brush, coats and paint quantities.
 By Dieter Kaufmann8 minute read
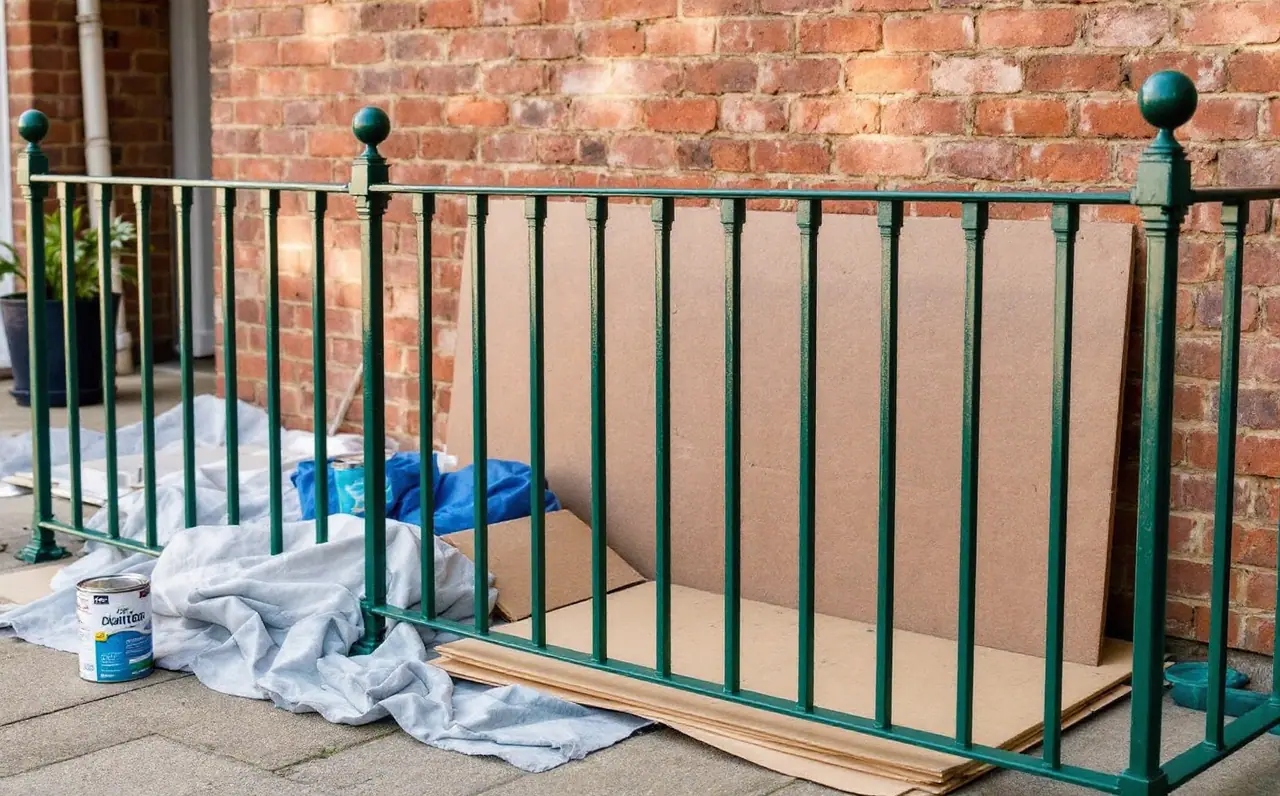
Railings look simple until you try to paint them. Every bar has four faces, two ends and a joint at the top and bottom, and every one of those is a place where rust starts. Spraying makes the job faster, but on open bar work a lot of what leaves the nozzle sails straight through the gaps and lands on the wall, the paving or the neighbour's car. So the real work is in the preparation, the masking and choosing the right way to apply the paint for your particular railing.
This is the order I work in. The steps are the same whether you are going back to the original colour or changing it.
Step 1: Choose the colour and the sheen
Most domestic railings end up in one of three RAL Classic colours.
- RAL 9005 jet black is the default for period houses and the easiest to find in ready-mixed metal paints and aerosols. Screens show it as roughly #131516, an approximation.
- RAL 6009 fir green is the deep, slightly blue-leaning green seen on a lot of older park and street railings. On screen it is about #26392F, again only approximate.
- RAL 7016 anthracite grey suits newer houses, especially where the window frames are already anthracite.
Look at a physical sample outdoors before you order, not a screen swatch. Then decide on sheen. High gloss looks smart on new steel but shows every pit and old repair on a railing that has rusted before. Satin is more forgiving and is what I would choose for most older ironwork. The note on powder coating gloss levels explains how gloss is described and measured; the same ideas apply to wet paint, even though the numbers on paint tins are often given as plain words.
Step 2: Wait for the right weather
Paint on metal outdoors is unforgiving about weather. You want a dry spell, mild temperatures and very little wind.
- Read the tin for minimum temperatures. Many metal paints give a lower limit for both the air and the surface, and the metal can be colder than the air early in the day.
- Watch for dew. A common rule on coating data sheets is that the surface should be at least 3 °C above the dew point. In practice that means waiting until morning dew has dried off the metal and stopping early enough that the paint is touch dry before evening dew settles.
- Avoid wind for spraying. Even a light breeze carries overspray a surprising distance and blows dust into wet paint.
- Check the forecast for the drying period too, not just the painting hours. Rain on half-dry paint leaves marks that need sanding out.
Step 3: Be careful with very old paint
If the railings have been painted many times over many decades, the lower layers may contain lead. Old lead paint dust is a real hazard, especially around children and pets. Do not dry sand it, and never burn it off with a blowtorch. Test kits for lead in paint are widely sold. If lead is present, use wet scraping and wet abrasive methods, collect the debris on sheeting, keep everyone else away, and clean up with a damp cloth rather than a brush. For heavy removal on a long run of old railings, getting professional advice is sensible.
Step 4: Remove loose rust and flaking paint
You do not usually need bare metal everywhere. You need a sound surface: everything loose comes off, and anything firmly stuck can stay.
- Scrape off flaking paint with a stiff scraper.
- Go over rusty areas with a wire brush. A wire wheel or cup brush on a drill is quicker, but wear eye protection, because bits of wire fly off.
- Sand the edges of the remaining sound paint with abrasive paper, roughly 80 to 120 grit, so they feather into the bare patches and do not show as ridges under the new coat.
- Give the whole railing a light scuff, so the new paint has something to grip on the old glossy areas.
Pay special attention to the bottoms of the bars, the underside of the bottom rail and the feet of the posts. That is where water sits and where rust always comes back first.
Where rust remains in pits that you cannot brush out, a rust converter can help. It reacts with the remaining rust to form a stable layer you can paint over. Converters are meant for rusty patches, not for bare clean metal or sound old paint, so apply it only where it is needed and follow the label for drying time and whether it needs rinsing.
Step 5: Degrease and clean
I am fussy about this step because skipping it causes more failures than anything else. Railings collect road grime, bird droppings, garden sprays and fingerprints, and paint will not stick properly to any of them.
Wash the railing with a degreaser or sugar soap solution, rinse with clean water and let it dry completely. Then wipe it down with whatever cleaning solvent the paint maker recommends, using clean cloths that you change often. From here on, handle the metal with gloves.
Step 6: Mask and protect the surroundings
Overspray from a railing goes everywhere. Before you open a tin:
- Lay drop cloths or old sheets over the paving on both sides of the railing.
- Tape plastic sheeting or paper over any wall the railing is fixed to, and mask around the base of the posts.
- Cover plants, bins, windowsills and anything parked nearby. If a car is on the other side of a front wall, ask the owner to move it.
- Keep a large sheet of cardboard to hold behind the bars while you spray. It catches the paint that passes through the gaps and lets you work closer to walls.
Step 7: Prime bare metal
Bare patches need primer unless you are using a direct-to-metal paint that says on the tin it can go straight onto bare steel. Direct-to-metal products save a step and are popular for railings because they combine primer and topcoat. If you use a separate primer, choose one the paint maker lists for use under their topcoat, and stick to one maker's system where you can. Mixing products from different makers can work, but if it fails, nobody's instructions cover it.
Prime the bare spots first, let them dry to the recoat time on the tin, and then decide whether the whole railing needs a full primer coat. On a railing that is mostly sound old paint, spot priming is usually enough.
Step 8: Choose brush, aerosol or spray gun
| Method | Best for | Drawbacks |
|---|---|---|
| Brush | Plain bar railings, edges, the bottoms of bars, thick direct-to-metal paints | Slow on ornate work; brush marks if the paint is overworked |
| Aerosol | Short runs, small gates, scrollwork and touch-ups | A lot of spray passes through gaps; thin coats; many cans for a long run |
| HVLP spray gun | Long runs and ornate ironwork | Thinning, setup and cleaning; masking takes longer; still wastes paint on open bars |
For a long run of decorative railings, an HVLP spray gun gives a smoother finish than aerosols and puts more of the paint on the metal. Thin the paint as the data sheet says, test the spray pattern on cardboard first, and spray each bar from several angles so all four faces get covered.
Whatever you spray with, wear a paint respirator with filters suited to the solvent in the paint. A simple dust mask stops particles but not solvent vapour. Two-pack (2K) paints, which contain isocyanates, need proper air-fed protection and are not for a home driveway at all.
On plain vertical bars I often brush rather than spray. It is slower, but very little paint is wasted and it reaches the joints better.
Step 9: Apply the coats
Two thin topcoats are better than one thick one. A thick coat sags on vertical bars, stays soft longer and traps solvent.
- Start at the top rail, then work down each bar, then do the bottom rail and the posts.
- Cover all four faces of each bar. Look from both sides of the railing.
- Leave the paint for the recoat time on the tin, not just until it is touch dry. Touch dry means dust will not stick; it does not mean the next coat will go on well.
- Lightly scuff any dust or runs before the second coat.
Drying times on the tin assume the temperatures stated there. In cooler weather everything takes longer, so allow extra time before recoating and before anyone leans on the railing.
A worked example: paint for 6 metres of railing
Take a simple bar railing 6 metres long and about 1 metre high, with 12 mm square bars at about 12 cm centres, a flat top rail and bottom rail, and three square posts.
| Part | Calculation | Area |
|---|---|---|
| Bars | 50 bars x 4 faces of 12 mm x 1 m | 2.4 m² |
| Top and bottom rails | 2 rails x 6 m x about 0.1 m around | 1.2 m² |
| Posts | 3 posts x 1.1 m x 0.2 m around | 0.66 m² |
| Total | rounded up for ends and brackets | about 4.5 m² |
Say the tin quotes a coverage of 10 m² per litre per coat. Check yours, because metal paints vary a lot. Brushed, one coat needs roughly 0.45 litres, so two topcoats need about 0.9 litres. I would get a litre plus a small tin, because edges, joints and a rough surface always use more than the figure on the tin. Primer for spot repairs is a small tin.
Spraying changes the sums. On open bar work a large share of the paint misses, so I would plan for at least twice the brushed quantity, and with aerosols I would check the coverage figure on the can and expect to need more cans than it suggests.
When to stop and get it coated instead
If the railings are badly rusted, removable and part of a bigger project, shot blasting and powder coating is often the better long-term finish. The doors, windows and metalwork notes cover that route. For railings fixed in place, careful preparation and two good coats of paint will last well, as long as you check the bottoms of the bars every spring and touch up chips before the rust gets underneath.
Dieter Kaufmann
Dieter has spent a lot of weekends around gates, trailers and garden furniture that needed stripping and coating. He covers powder coating, metal preparation and primers, and he is fussy about degreasing.
More from the same drawer
Which primer colour to use under a RAL topcoat
Primer shade decides how many topcoats you need and whether a yellow or red ever looks right. How to pick white, light, mid or dark grey under a RAL colour.
Read the note
Choosing a garage door colour that suits the house
Match the windows or contrast on purpose, test a big card outside, and check the door maker's RAL list before you commit to a garage door colour.
Read the note
RAL 7016 anthracite grey on windows and doors
Why RAL 7016 anthracite grey ended up on so many window frames and doors, how it behaves in daylight, what it pairs with and when a neighbouring grey suits better.
Read the note